STEP 1
Download the App to Your Device
The Preferences page provides for some limited control over the operation and displays of the application. It also provides inputs for various information about you and your company that will be used when projects are exported.
The following information can be provided for each user.
Nickname
Enter – your first name
Name
Enter – your first and last name
Company
Enter – Pool Fits
Address
Enter – your address
You may also use your current location to fill in the user’s address. You can use the button to use the device’s location functions to identify your current location. Be sure to confirm the provided address, since the location service may not always provide the correct address.
Phone
Enter – your home phone #
Mobile Phone
Enter – your mobile phone #
Enter – your e-mail address
A’s then B’s
Ensure the all A’s then all B’s mode is enabled for the Measure screen.
When enabled, the Measure screen will advance to the same input for the next point instead of advancing to the next input when entering the AB data.
Units of Measure
The units of measure specifies what length measurement units are to be used. You may choose between the following units:
Inches
All measurements will be converted to inches for display within the app.
Feet and Inches
All measurements will be converted to feet and inches for display within the app.
TIP: Use Feet & Inches!
Decimal Digits
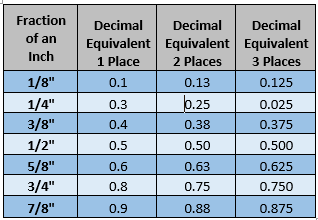
The decimal digits field specifies how many decimal places to show for fractions of inches. Typically 2 decimal place will be sufficient and measurements to the nearest ¼” are required.
Popup Keypad
The popup keypad checkbox provide control over the use of a popup keypad for measurement inputs.
When checked, a small numeric keypad will appear when a measurement input is selected to allow for faster data entry. When not checked, the device’s normal keyboard will be used.
Pictures
The pictures checkbox provides control over where pictures taken from within the app are saved.
When checked, pictures are saved within the app and also to the camera roll photo gallery. When not checked, pictures are only saved within the app.
Analytics
The analytics setting provides control over the anonymous tracking of user analytics. If set, the application will anonymously track and report, via a third-party analytics service, on some of the interactions you have with this application. No user identifiable information is collected. This information is collected to assist Pool Fits in understanding how users use this application with a goal of improving the user experience.
TIP: Click ‘allow’ and help us improve the app!
Swipes
The swipes setting allows you to enable or disable swipe gestures to switch between the project screens. Enabling swipes allows left and right swipes to move between the project Info, Basics, Measurements, Extras, and Review screens.
TIP: Click ‘allow’ everybody likes to swipe!
Speech Output
To reduce the amount of time needed to look at the screen, i-Measure My Pool can be configured to make changes to any of the measurement values via speech. Any changes to the measurements will use synthesized voice to read back the new measurement value. This allows you to hear the measurement instead of having to read it in order to catch typos and mistakes.
These following options are available to configure speech output.
Speak Measurements
This checkbox is the overall control for enabling speech output. Selecting this option will enable voice output for all changes to measurement values within the app.
Speech Rate
The speech rate slider controls have fast the synthesized voice speaks. Higher values result in faster speech.
The default value of 1 represents normal speech. A value of 2 represents speech that is twice as fast as normal. And, a value of 0.5 represents speech that is half normal speed.
Speech Voice
A number of different voices are available in this list. Select the voice that works best for you.
Note: All of the listed voices may not be readily available on your device. The system may need to download and configure the voice before it can be used. If the voice does not change when you select a different voice, try again sometime later when the system has had a chance to configure the voice.
Local Voices will be processed locally on your device.
Other Voices may require access to the internet for proper operation.
Speech Test Message
The speech test message can be used to test the different values of the above settings to help you find a voice and speech rate that works well for you. You may change the message that is spoken.
Use the Test button to begin the speaking of the test message.
Bluetooth Headset
For speech output and voice recognition, you can control whether or not the app connects to and uses a Bluetooth headset, if available. If enabled, the app will attempt to use the headset instead of the device speakers and microphone.
For voice recognition, the talk button on the headset can be used to stop voice recognition. But the talk button cannot be used to start voice recognition.
Voice Recognition
To free your hands from typing on your device while recording measurements, i-Measure My Pool can be configured to enable voice recognition for the input of measurement values.
A list of the voice commands available is provided on the Voice Commands help page.
Warning: The use of voice recognition results in increased network data usage and a higher load on your battery.
These following options are available to configure voice input.
Voice Input
This checkbox is the overall control for enabling voice recognition for input. Selecting this option will enable voice recognition within the app. Inputs that support voice recognition will have an icon associated with them.
TIP:Click if you prefer Voice Input – Manual Entry works well too!
Continuous Input
The Measure screen supports continuous input for voice commands while entering A-B measurement data.
When continuous input is enabled and voice recognition has been started, the app will continue to listen for new measurement data and commands until stopped. This allows you to provide multiple measurements to the app without requiring you to interact with the app’s display.
Note: Continuous input will consume more battery and network data than when continuous input is disabled.
Note: If continuous input is disabled, the Measure screen will listen only for a single command. You will have to restart the voice recognition for each command.
Local Recognition (Android Only)
When selected, the app will prefer to perform voice recognition using a local, on-device, voice recognition engine.
Your device may or may not support on-device voice recognition. If not, a remote, internet-based voice recognition engine will be used.
The use of an on-device voice recognition results in reduced network data usage but may not provide results that are not as good as a remote internet-based engine.
Navigate to Projects Screen
 Creating New Projects
To create a new project, tap on the button. The app will then show a list of the types of measurement projects you can create. Select the type of project you want to create from the list. The app will create the new project and take you to the INFO page to get you started on your new measurement project.
The following measurement project types are currently supported.
 Creating a New Freeform Cover Project
To create a new freeform cover project, tap on the Freeform Cover entry. You will be able to choose the type of cover (safety, lay-on, etc.) on the project’s BASICS page.
Freeform cover projects use the AB measurement method to measure the pool. This method can be used to measure any pool shape.
 Creating a New Freeform Liner Project
To create a new freeform liner project, tap on the Freeform Liner entry.
Freeform liner projects use the AB measurement method to measure the pool. This method can be used to measure any pool shape.
 Creating a New Oval Cover Project
To create a new oval cover project, tap on the Oval Cover entry.
Oval cover projects use the basic characteristics of an oval for the pool measurements such as its length and width. This method can be only used to measure pools in the shape of an oval.
 Creating a New Oval Liner Project
To create a new oval liner project, tap on the Oval Liner entry.
Oval liner projects use the basic characteristics of an oval for the pool measurements such as its length and width. This method can be only used to measure pools in the shape of an oval.
 Creating a New Rectangular Cover Project
To create a new rectangular cover project, tap on the Rectangular Cover entry.
Rectangular cover projects use the basic characteristics of a rectangle for the pool measurements such as its length and width. This method can be only used to measure pools in the shape of a rectangle.
 Creating a New Rectangular Liner Project
To create a new rectangular liner project, tap on the Rectangular Liner entry.
Rectangular liner projects use the basic characteristics of a rectangle for the pool measurements such as its length and width. This method can be only used to measure pools in the shape of a rectangle.


For liners, the wall height of the pool is measured relative to the bead receiver for the liner. Do not measure from the deck surface or the coping. The figure illustrates how to take the wall height measurements.
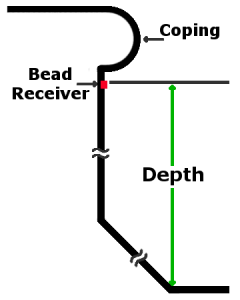
For liners, the depth of the deep end is also measured relative to the bead receiver and not from the deck surface or coping. The figure illustrates how to take the deep end depth measurement.
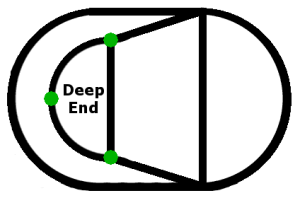
Note: For liners, three measurements are required for the slopes of the deep end. The figure illustrates where to take these measurements.
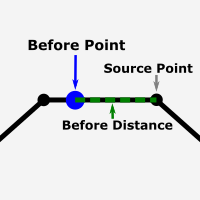
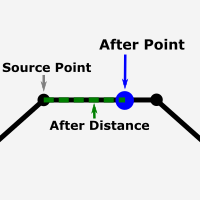
These measurements are the horizontal distance from the perimeter of the pool to the bottom of the slope. This is not the measurement down the slope. It is the distance straight out from the side of the pool to where the slope meets the bottom of the deep end. The following figures illustrate the slope measurements.
End Slope

Side Slopes

Corner Type
Use the corner type input to describe the shape of the pool corners. Select the appropriate corner type from the drop-down menu.
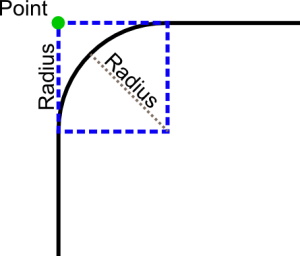

Corner Size
This input is shown for round and diagonal corner types. The following figures show how this measurement is taken.
Hopper Pad Type
Use the hopper pad input to describe the shape of the pool hopper. The hopper pad’s shape is defined by the shape of the hopper’s corners. Select the appropriate hopper pad shape from the drop-down menu.


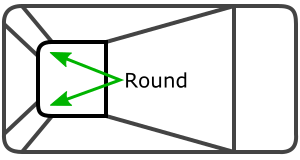
Hopper Pad Size
This input is shown for round and diagonal hopper pads – As prompted.
For All Pool Types
Liner Pattern
Liner patterns are chosen by tapping or clicking on the displayed liner pattern image. This takes you to the Liner Patterns page where all of the currently known liner patterns are displayed for you to choose from.
Enter the name of the liner pattern to use for this liner.
TIP: Default – Pool Fits has a separate process for your order to capture liner pattern
Enter the desired thickness of liner material to use for this liner.
TIP: Default – Pool Fits has a separate process for your order to capture liner gauge
The bead type indicates the style of bead used to fasten the liner to the pool wall. The bead type is chosen from the list of known bead types.
TIP: Default – Pool Fits has a separate process for your order to capture your liner bead type
Select the color for the liner bead. You may want to match the liner bead color to the color of the coping or to the main color of the liner wall pattern.
TIP: Default – Pool Fits has a separate process for your order to capture your liner bead type
![]()
Project Review – Review your measurements and input
The Review page contains various information about your project for you to review. Most importantly, it provides output from the application’s intelligent warning system to help you catch and avoid common measurement issues.
Pool Plot
The measurement data for the pool is plotted and presented for your review. You should review the plot to confirm that it is an accurate representation of the pool itself. You can tap on the plot of the pool to be presented with a full screen version of the plot to make it larger and easier to see.
Shape
The Shape checkbox asks you to confirm that the plotted image exactly matches the shape and orientation of the pool. If you stand between the A and B pegs and look at the pool, the shape of the pool and the plotted outline of the pool should match. If not, you may have reversed your A and B peg order.
Swap AB Measurements
For freeform projects, if the Shape checkbox has not been checked, the Swap AB Measurements button will be shown. Tapping on this button will swap all of the A and B measurements which will horizontally flip the plot of the pool.
Warnings
The warnings box contains the output from the intelligent warning system. Any warnings about the status your project will be shown in this box. It is recommended that you resolve any warnings prior to leaving the site to be sure that you have all of the data required for your project.
Additional Comments
You can add any additional comments about the project in the free-form text box.
View Report
The View Report button takes you to the Report page. The report page contains a human readable report of all of the project information. The report page allows you to review the data that you have entered for the project on a single screen.
![]() Project Report – The output from the measuring and input
Project Report – The output from the measuring and input
Reports
i-Measure My Pool sends Reports in various formats for use by Pool Fits and our manufacturers
Attachments
The Attach Pictures checkbox must be checked if you want any associated pictures to be sent with the email.
Tip: Pictures are always helpful!
Process
Use this input to specify if the project should be processed to provide a quote for the project or if it should be processed as an order.
Tip: Always Click on Quote to avoid entering a Purchase Order # and Pricing Information which are not required by Pool Fits!
Email Message
The email message body is pre-populated with some basic information about the project. You can change the information in the message to suit your needs.
Email Signature
The email signature contains the contact information for the currently selected user. This signature will be appended to the email message when the project is sent. This field is read-only and cannot be changed.
![]() Project Send – email your measurements to Pool Fits
Project Send – email your measurements to Pool Fits
Tap on the Send button to send the project reports to the Pool Fits
Note: Below the send button, the state of the network connection is displayed. A network connection is required to send the project reports.